A Masking Tutorial!

Hello! I am here to share a tutorial today!! Woot, woot!!
First off, I have got to tell you how much fun I have working with Market Street Stamps! I love the quality, it is simple unbeatable. The fact that you can see through them to know exactly where you are stamping, and then the crispness that the images have, it's just amazing.
Ok, enough of my praising {but I do hope you all know first hand of what I am talking about}.

The technique that I will be sharing with you is another type of masking.
The first thing I did was take the card base and inked the edges with a blending tool and Antique Linen Distress Ink to give it a vintage feel.
I then, took a peice of kraft cardstock and stamped it with the Grace background using Angel Pink Momento Ink.
In the picture above you can clearly see the background as it is still wet. But when the ink dries, the images will only show very faintly, adding just the slightest, prettiest addition.
Next, I cut out a label shape using my Silhouette Cameo {I absolutely love this thing!} and again distressed the edges using Antique Linen Distress Ink.
I then stamped the cake from Celebrate Cake on the label using Frayed Burlap Distress Ink. {Looking back, I should have used a different ink, such as Momento, that would not bleed when wet.}
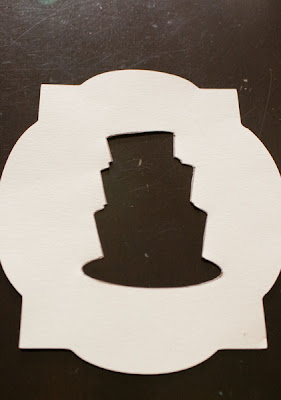
On an scrap piece of paper, {I used a label that I had originally cut but was too large} I stamped the cake again and then cut it out to use as the mask.
On top of my craft mat, I taped my masking label on top of the label for the card. I then sprayed it with Tattered Angels' Vanilla Breeze.
As you can see, the spray is confined to the cake. When dry, I applied the pearls in the circles on the image.
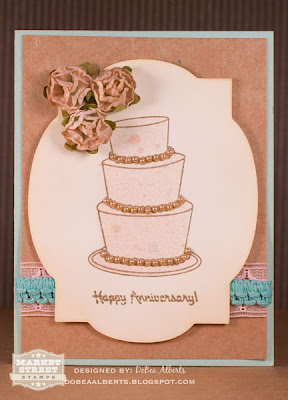
And here is the finished product! I also sprayed the Prima flowers with the Vanilla Breeze and added a couple different ribbons to the kraft cardstock and then stamped the Happy Anniversary! in the Frayed Burlap Distress Ink.
Above is a close up of the flowers and cake. I hope you find this tutorial helpful!!

Make sure you stop back tomorrow when I will be beginning my Spirit of Giving giveaways! You could have the chance to win some sweet prizes!!!

Comments

  1. DoBea this is BEAUTIUL and such an awesome technique! I LOVE this idea! Thanks for sharing your ideas and giving tutorials of how to do it! Hugs- Glora

    ReplyDelete
  2. This turned out so beautifully! I am going to have to try this ASAP!!!

    Hugs!
    Raven

    ReplyDelete

Post a Comment

Popular posts from this blog

Kathy's Surprise Birthday Card Hop!

(Welcome everyone! I am so glad you could join us for Kathy's Surprise Birthday Card Hop. Hopefully, you all have made it okay from Linda's blog. At the bottom of this post will be your link to the next blog, but if you are jumping around on your own, or have gotten lost there will also be the entire list of links.) "They say it's your birthday We're gonna have a good time I'm glad it's your birthday Happy birthday to you." The Beatles Well, Miss Peachy Keen Queen, I hope you have the most wonderful day today. You and your family have been a blessing in my life. I am so glad to have met you that day in the Copic Certification class. I am sending you massive wishes and kisses!!! Ladies, for this card I used paper from Crate Paper and Sassafras Lass. The stamps are, of course, from Peachy Keen Stamps . The orange came from Faceless Fruit and the faces are Happy Lashes . I also used Copics to color in the oranges. Don't forget to ...

Peachy Keen Fall & Halloween Blog Hop!

Welcome! Glad you made it safely from the Peachy Keen blog . ;) I hope you are ready to be blown away by the inspiration you are about to see! Not only do you get to be inspired by the current Peachy Keen Design Team, but we have the alumni joining us also!! So, you  get to see almost double the projects!!! Also, before I forget, check out this super awesome deal coming to you from the Peachy Keen Stamps site! Some restirtions apply:  *excludes Sale and Clearance Items, Gift Certificates, Clip-it-Ups, and Club Memberships So, here are my cards I made. This first one was made using The Uglies . And this next one was made using Faceless Fall Fun 2  (the candy corn and sign), In Stitches Face Assortment  (faces), and the September Stamp of the Month Kit (sentiment). Now, you want to know what you could WIN??? How about one of five gift certificates? Yep, that's right five! There are four $25 gift certificates and one $50!!! ...

Peachy Keen Guest Designer Day 2

Welcome back to day number two!  I am so happy to see you all back here for my Guest Design Team spot for Peachy Keen Stamps . For today's project I will be using the Tuesday Sketch Challenge from the Challenge Blog . I used the Cheers and Green Beer stamp set for my card. I have been so focused lately on Valentine's Day that I have completely blocked out St. Patty's Day! But here is a card to remedy that. I used my Copic Markers to color in the images and used my Spica Glitter Pens for added definition. I am glad to say that I think I am finally getting the hang of these markers. I masked the coins to give a continuous border of them and used a pop dot under the mug of green beer. Don't forget to leave a comment here and at the Peachy Keen Blog for your chance to win the Valentine Cupids stamp set! Thanks for stopping by!!! Card Recipe Stamps: Peachy Keen Stamps {Cheers and Green Beer} Patterned Paper: Fancy Pants Designs Ink: Momento Markers: Copic Glitter Pens: ...